The Spotify Effect: Building Audio-First Content Experiences in Drupal

Content consumption going into 2026 looks a lot different to how it did even 10 years ago. Engagement and attention is the currency that is traded in and it is terribly difficult not only to get, but also maintain. Platforms like TikTok, Instagram and even YouTube serve audiences gratifying, instant information without the upfront investment of reading. This isn't laziness or attention spans, but the cultural shift with which we must align.
For some background, I blame the podcast revolution for this. The podcast revolution changed expectations. Spotify, Apple Podcasts, YouTube explainers - they've trained audiences to expect audio versions of everything. Written content now competes not just with other articles, but with the entire ecosystem of audio-first media designed for multitasking consumption.
As content creators, authors, editors and marketers, we have a couple of choices: the first is resist this trend and insist people sit down to read, or meet our audiences where they are. I'm pragmatic about this (although not always enthused). The cultural shift is real, measurable, and not reversing. If someone's going to consume your content whilst on the treadmill, you can either provide a quality audio experience or watch them choose a podcast or platform that supplies this instead.
I don't like seeing this as a replacement to reading as I find I glean completely different results in either format. It's about removing friction between you as a creator and your audience. Some will listen whilst commuting and others will read at their desk. Both are valid and both should be effortless.
So how do we build audio-first experiences without manually recording every article? Enter Drupal CMS with AI automation.
What We're Building
By the end of this guide, you'll have:
- Automatic audio generation when content is saved
- A Spotify-like sticky audio player that follows users as they scroll
- Professional text-to-speech using OpenAI's voice models
- Zero manual effort from content editors
Every article, blog post, or page gets an audio version automatically. Content editors write normally, hit save, and the audio appears.
Prerequisites
You'll need:
- Drupal 11 installation with Drupal CMS
- An OpenAI API key (for text-to-speech generation)
- Composer access to install modules
- Basic familiarity with Drupal field management
This guide assumes you're working with a standard Drupal CMS installation. If you're on Drupal 10 or need help getting Drupal 11 set up, check out our introduction to Drupal or our comprehensive guide to Drupal on DigitalOcean.
Step 1: Install the AI Assistance Recipe
Drupal CMS ships with an AI Assistance recipe that provides the foundation for AI-powered features. This recipe includes the core AI module and its dependencies.
Install the recipe through the Drupal admin interface:
- Navigate to Administration > Extend > Recipes
- Find "AI Assistance" in the available recipes
- Click "Apply recipe"
- Wait for the installation to complete
This recipe installs and configures the base AI module, setting up the infrastructure for AI providers and automations.
Step 2: Configure OpenAI as Your AI Provider
This should have already been done with the above recipe (if so skip to step 3).
With the AI module installed, you need to configure OpenAI as your text-to-speech provider.
- Navigate to Administration > Configuration > AI > Providers
- Add a new provider or edit the existing OpenAI configuration
- Enter your OpenAI API key
- Save the configuration
Your API key is available from the OpenAI platform dashboard. Standard API pricing applies - OpenAI's TTS models are remarkably affordable for most use cases (roughly $15 per million characters).
For organisations with data residency requirements or budget constraints, you can alternatively use self-hosted text-to-speech solutions. The AI module's provider system supports multiple backends.
Step 3: Enable Required Modules
You need two additional modules for the automation workflow (both of these are submodules of the ai module):
drush en ai_automators field_widget_actions -y
Or via the admin interface:
- Navigate to Administration > Extend
- Find and enable "AI Automators"
- Find and enable "Field Widget Actions"
- Save your changes
What these modules do:
ai_automators: Provides field-level automation rules that trigger on content savefield_widget_actions: Enables AI actions directly on field widgets in the content editing form
Together, they let you configure fields to auto-populate from AI when content is created or updated.
Step 4: Create or Configure Your Audio Media Type
Create a Media type called Audio.
Navigate to Administration > Structure > Media types.
- Click "Add media type"
- Name it "Audio"
- Choose "Audio file" as the media source
- Save
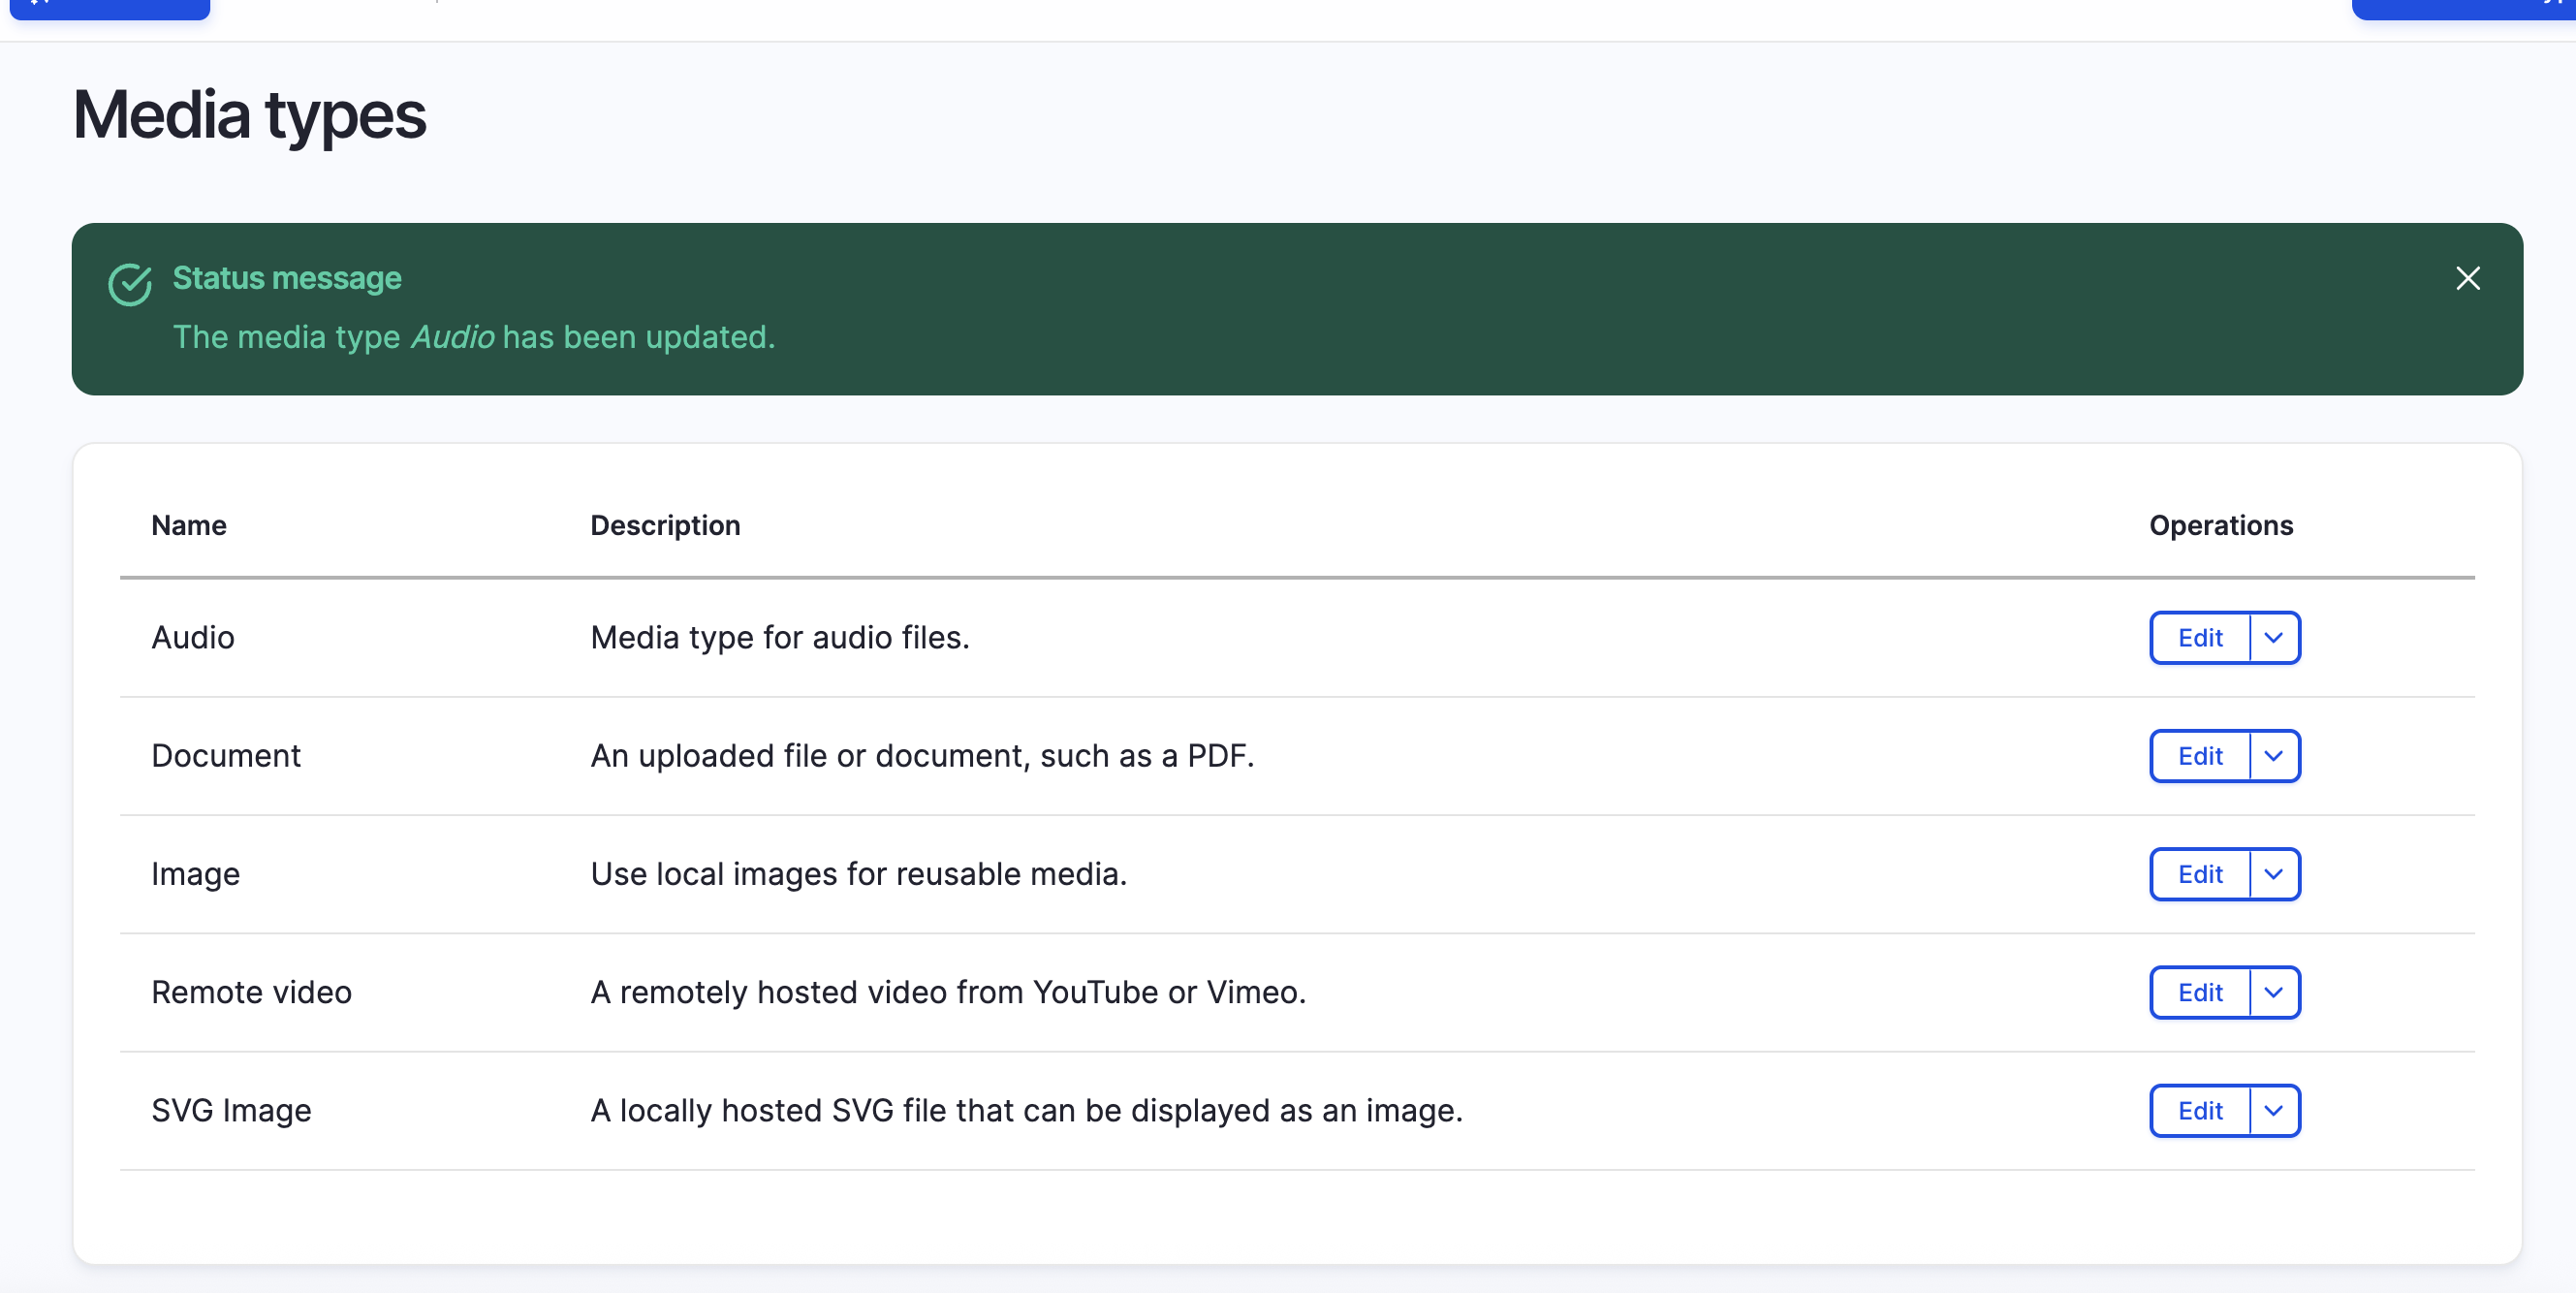
The key field here is field_media_audio_file - this is where the generated audio file will be stored.
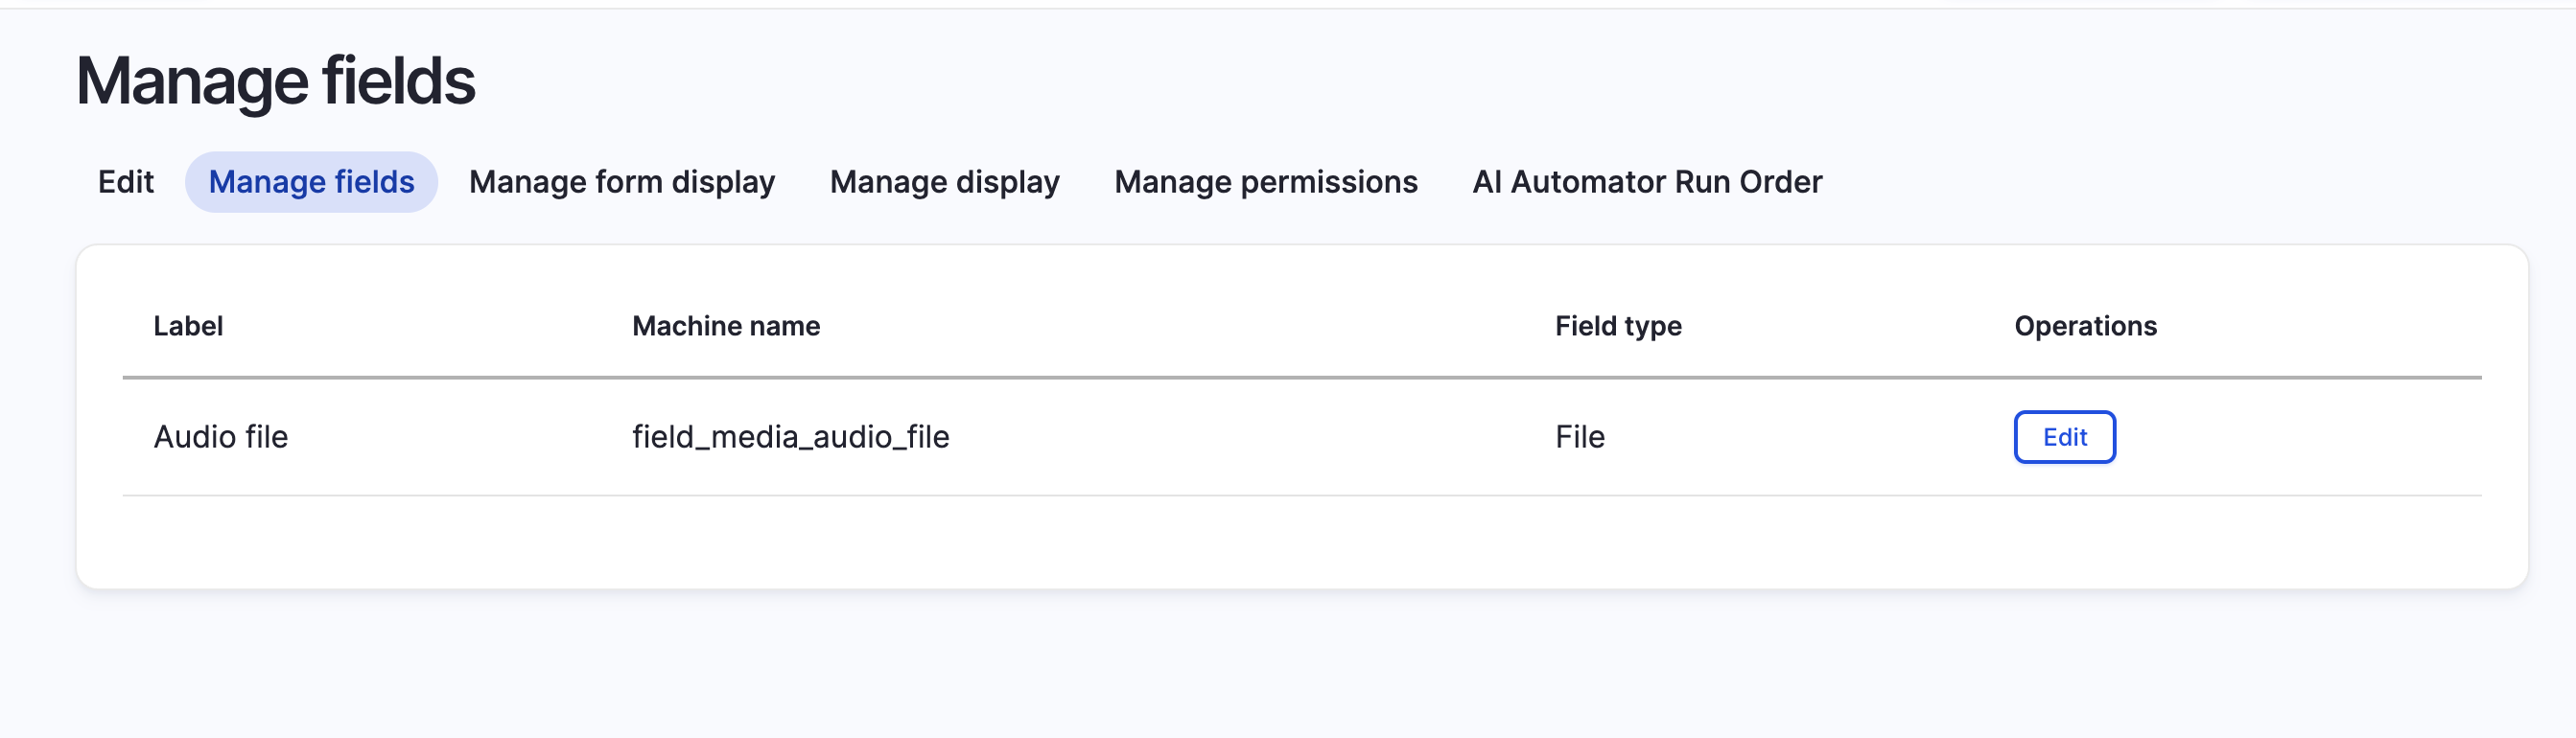
Step 5: Add Audio Field to Your Content Type
Now we'll add an audio field to your content type (Article, Blog, Page, or whatever you're using).
- Navigate to Administration > Structure > Content types
- Select your content type (e.g., "Article")
- Click "Manage fields"
- Click "Add field"
- Choose "Reference > Media"
- Label it "Audio" (machine name:
field_audio) - Configure the field:
- Reference type: Media
- Media type: Audio (restrict to only Audio)
- Required: No (optional, but recommended to keep it optional)
- Save field settings
This creates the relationship between your content and its audio version.

Step 6: Configure the AI Automator on the Audio Field
This is where the magic happens. We'll configure the audio field to automatically generate speech when content is saved.
- Still in "Manage fields" for your content type, click "Edit" on your Audio field
- Scroll down to find the AI Automator section
- Toggle "Enable AI Automator" to ON
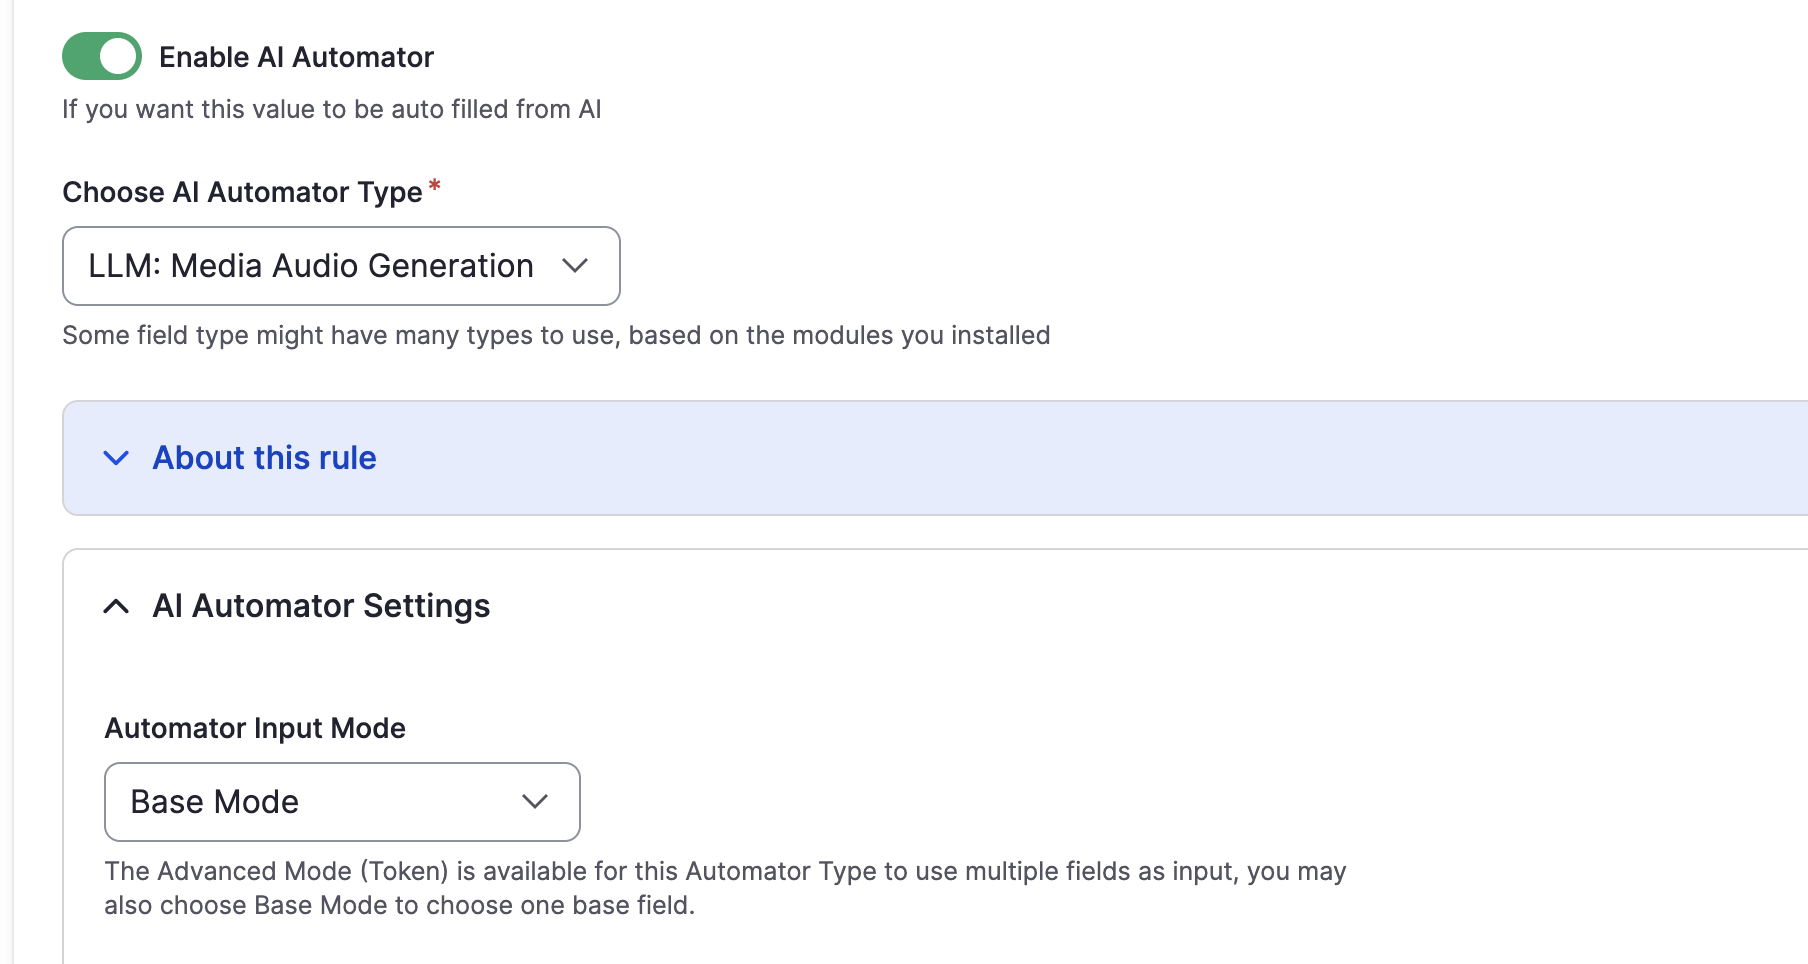
Once enabled, you'll see several configuration options:
Choose AI Automator Type
Select "LLM: Media Audio Generation" from the dropdown.
This automator type takes text input and generates audio media entities automatically.
Automator Settings
Automator Input Mode: Choose "Base Mode"
Base Mode uses a single field as input. In our case, we want to convert the article's main content into speech.
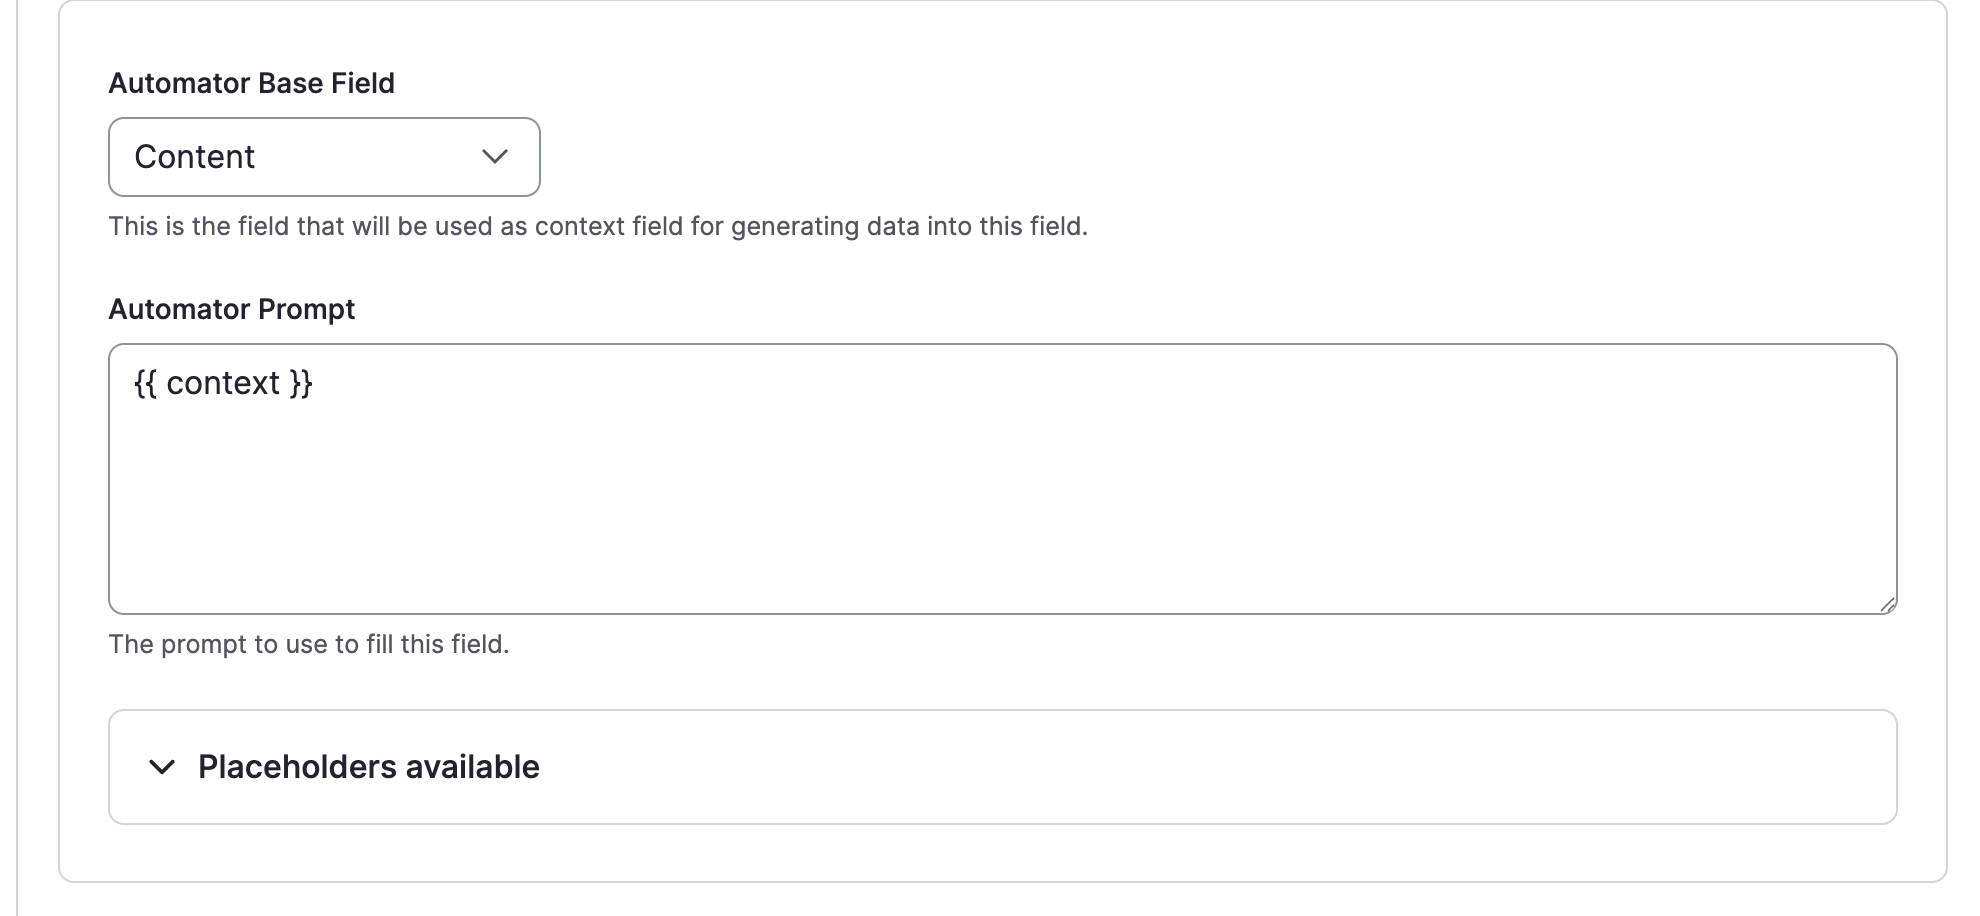
Automator Base Field: Select "Content" (or whichever field contains your main article body)
This tells the automator which field to use as the source text for audio generation.
Automator Prompt: Enter {{ context }}
This is the token that represents your content. The AI module will replace this with the actual content from the base field when generating audio.
Advanced Settings
Expand the "Advanced Settings" section.
Automator Weight: Set to 100
If you have multiple automators on different fields, weight determines the processing order. Higher weight means it runs later. Since audio generation might depend on other fields being populated first, 100 is a safe default.
Automator Worker: Select "Direct - Processes and saves the value directly"
The Direct worker generates the audio and saves it immediately when content is saved. I did this for smaller articles, but you may want to do Queue/Cron as articles get larger.
Other options:
- Field Widget: Processes when the user takes action (manual button click)
- Queue/Cron: Defers generation to a background queue
For automatic audio generation on save, "Direct" is what you want. Note that this can add a few seconds to the save operation depending on content length, so ensure your PHP timeouts are reasonable.

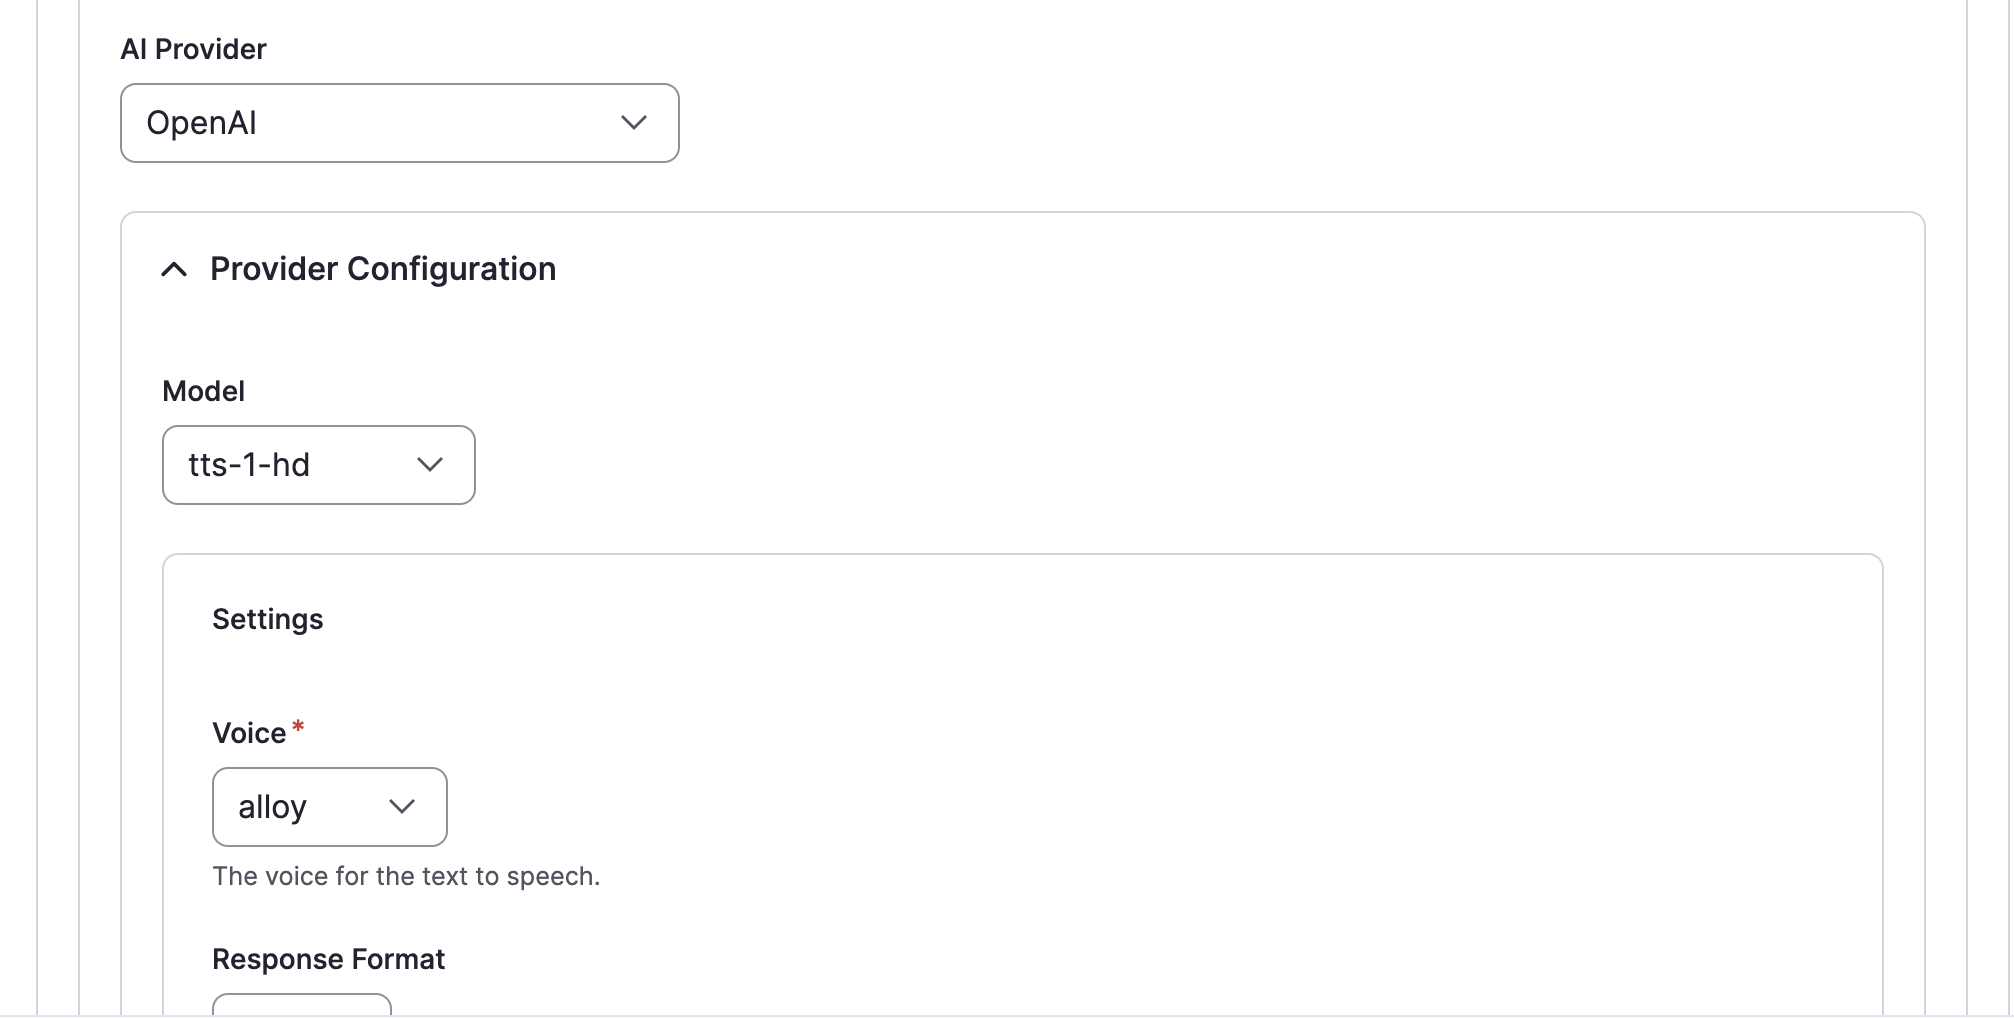
AI Provider Configuration
Expand "Provider Configuration" to access text-to-speech settings.
AI Provider: Select "OpenAI"
Model: Choose tts-1-hd
OpenAI offers two TTS models:
tts-1: Standard quality, faster generationtts-1-hd: Higher quality, slightly slower
For published content, the HD model is worth the marginal extra cost and generation time.
Voice: Choose your preferred voice
OpenAI offers several voices: alloy, echo, fable, onyx, nova, shimmer
Listen to OpenAI's voice samples and pick one that matches your content's tone. I typically use alloy for technical content - it's clear, neutral, and professional.
Response Format: Leave as default (usually MP3)
MP3 provides the best balance of quality and file size for web delivery.
Save your field configuration. The automator is now active.
Step 7: Install and Configure the Sticky Audio Player
Now we need to display the audio in a way that provides that Spotify-like experience. This is where my Sticky Audio Player module comes in.
Install via Composer:
composer require 'drupal/sticky_audio_player:1.0.x-dev@dev'
drush en sticky_audio_player -y
Or download it from Drupal.org and install via the admin interface.
Configure the Field Display
- Navigate back to your content type: Administration > Structure > Content types > [Your Type]
- Click "Manage display"
- Find your Audio field in the field list (I have mine in Layout Builder below)
- Change the format dropdown from "Default" to "Sticky Audio Player"
Player Configuration Options
Button Text: Set to "Listen to Article" (or your preferred text)
Button Icon: Enter an emoji or icon or empty
Autoplay on Button Click: Check this box to automatically start playing audio when a user clicks the button. This is enabled by default and recommended for better UX.
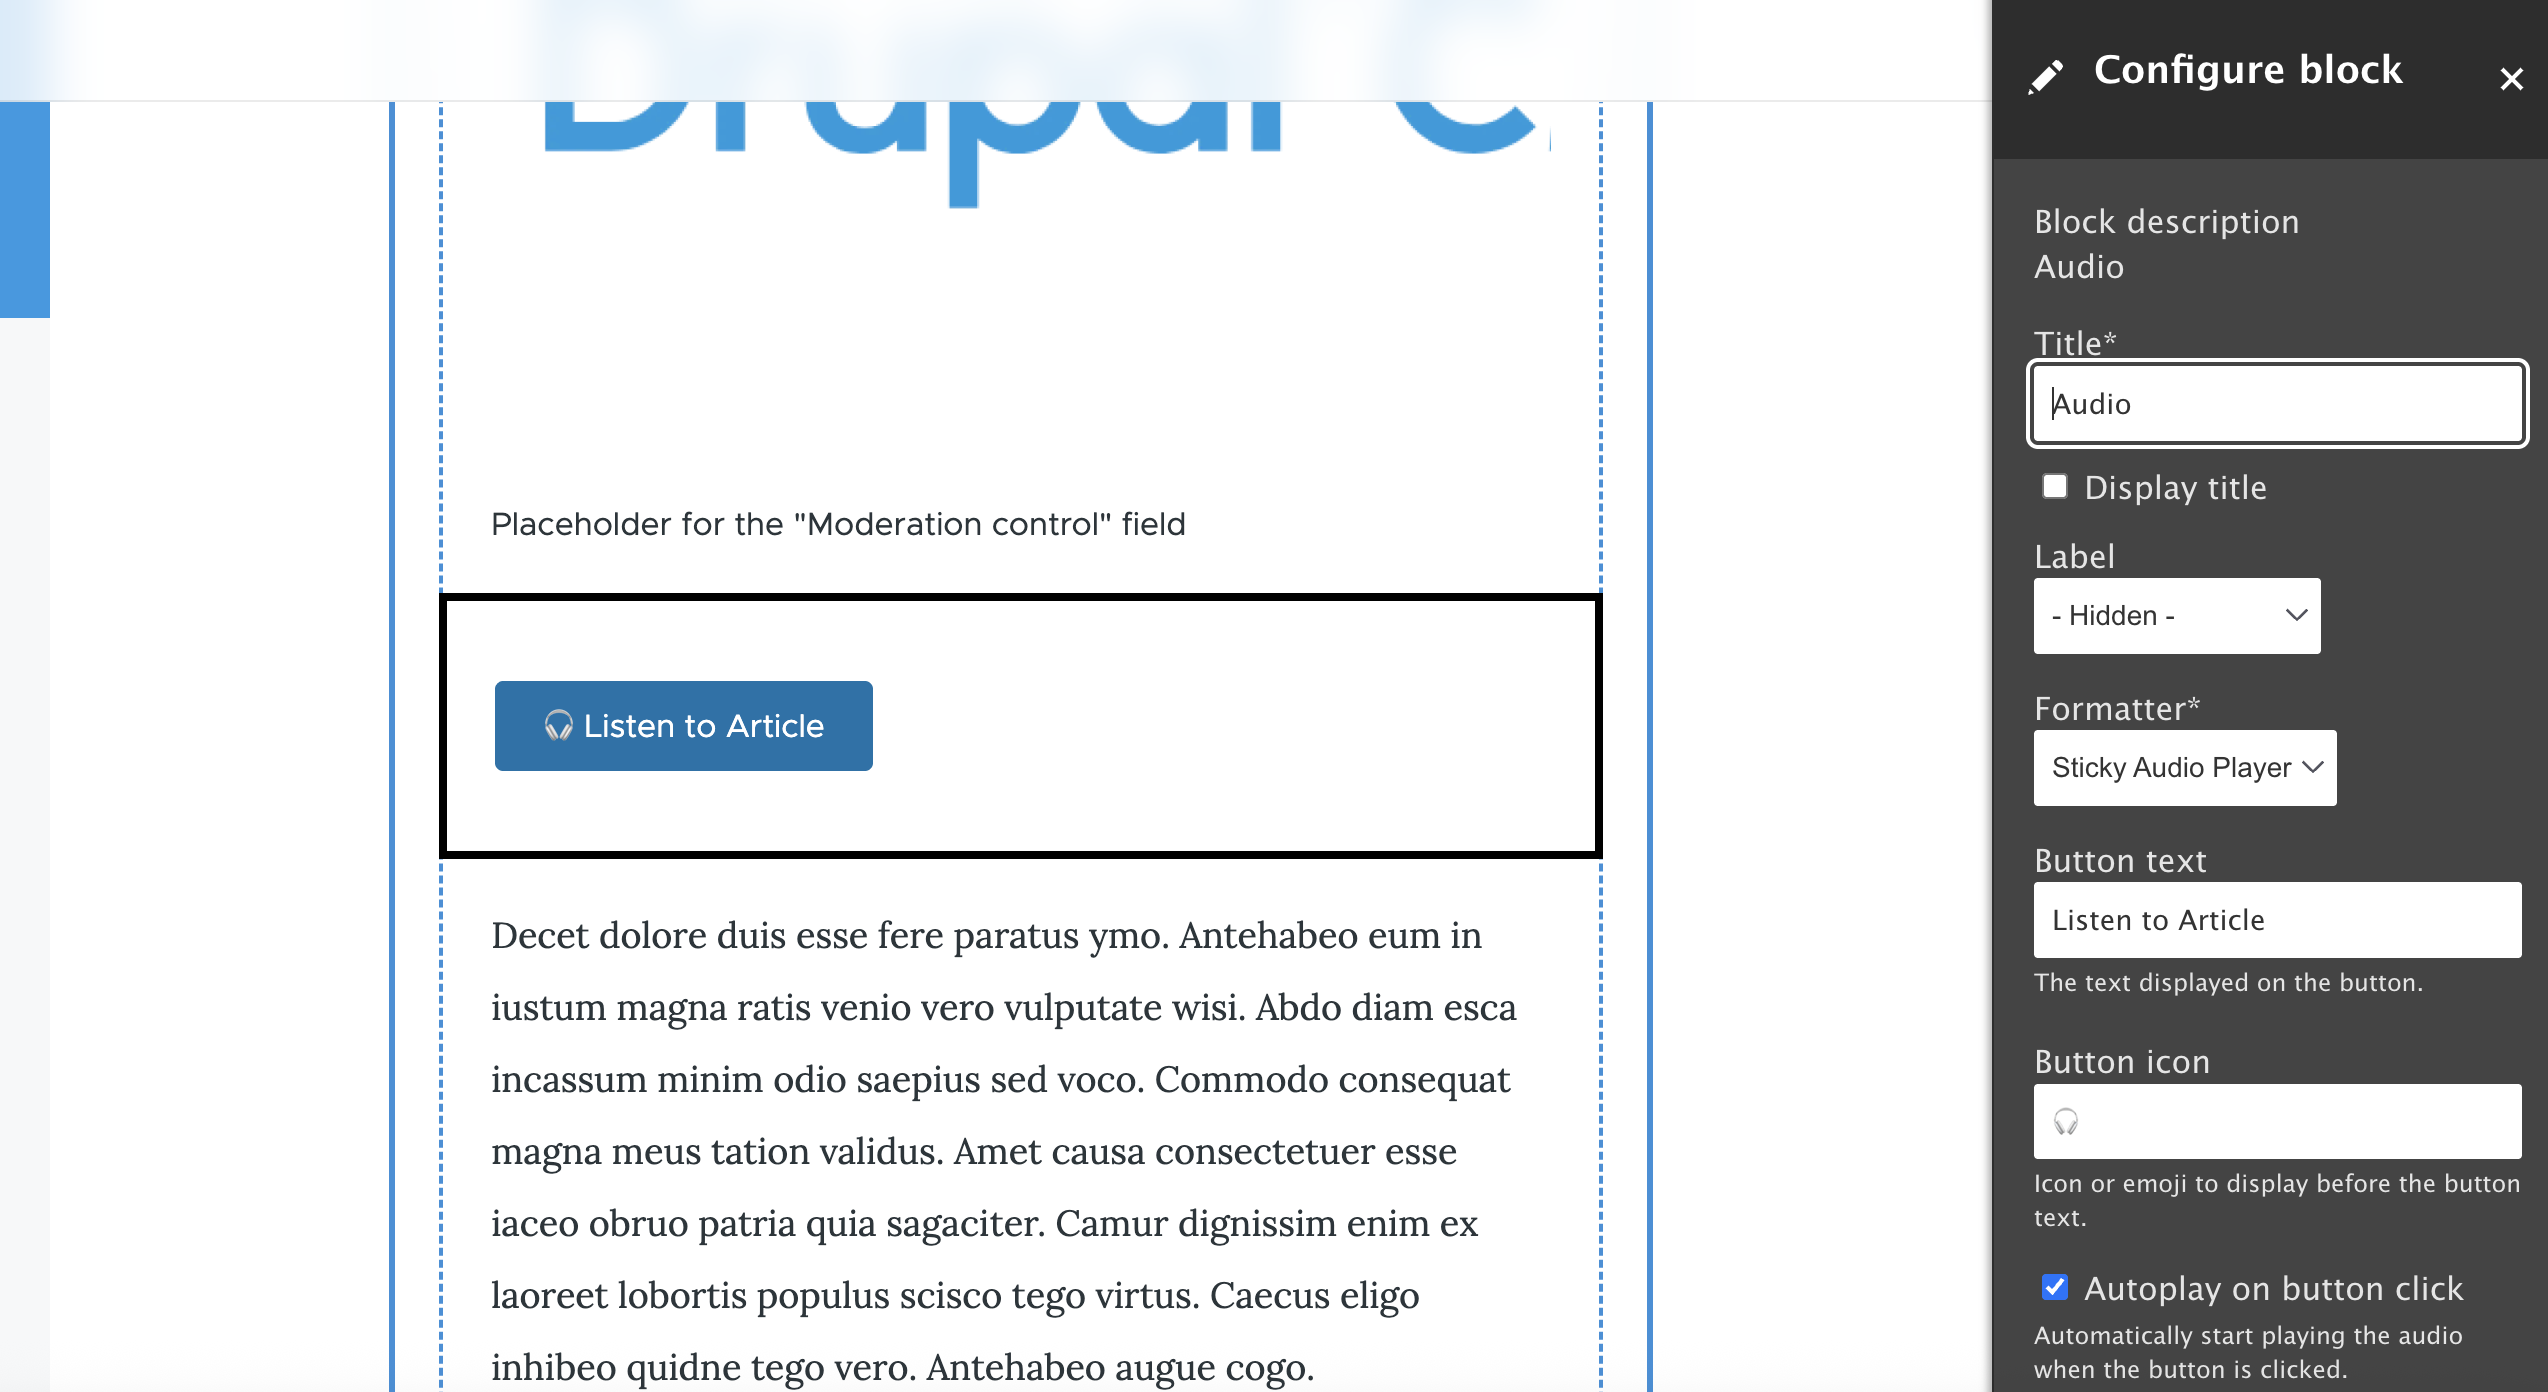
Save your display settings.
Step 8: Test the Complete Workflow
Let's verify everything works end-to-end.
- Navigate to Content > Add content > [Your Type]
- Write a test article with a few paragraphs of content
- Don't touch the Audio field - leave it empty
- Save the content
You should notice the save operation takes a few seconds longer than usual - that's the AI generating your audio in real-time.
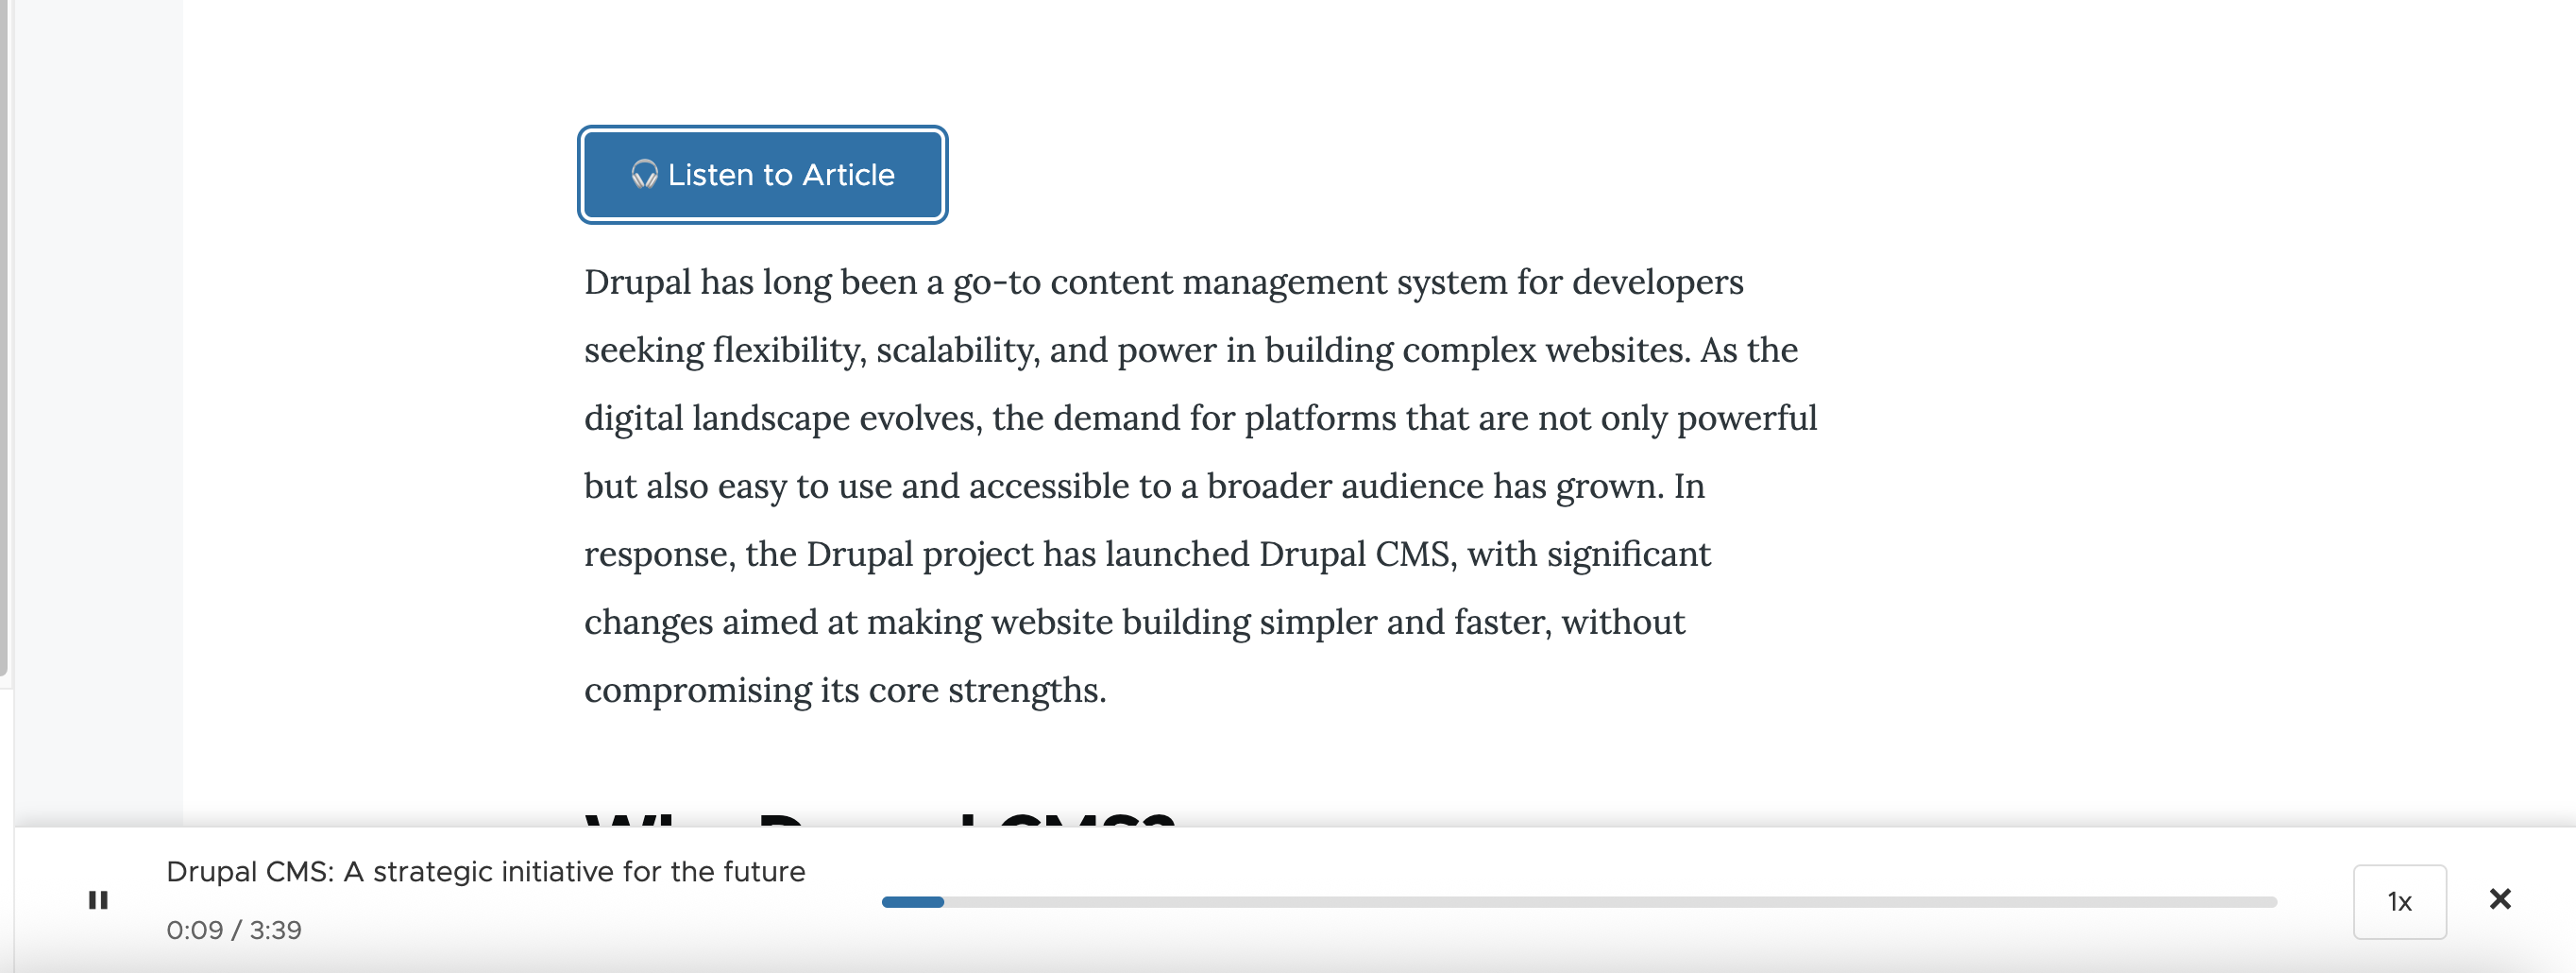
After the page reloads:
- You should see a "Listen to Article" button near your content
- Click the button
- Audio playback begins automatically
- The player becomes "sticky" - scroll down the page and notice the player follows you
- Playback controls stay accessible as you read
If you edit the Audio field on your content, you'll see it now references a generated media entity. The automator created both the audio file and the media entity, and referenced it from your content - all automatically.
This feels like magic (well, it does to me), but is really just a tiny bit of the reality to what sort of impact AI is having on the wider web.
Performance Considerations
A few technical notes for production deployments:
Save Performance: Direct audio generation adds 2-10 seconds to content saves depending on content length. For editorial workflows where this is disruptive, consider switching to the Queue/Cron worker instead. Content saves complete immediately, and audio generates in the background.
Storage: Audio files are roughly 1MB per minute of speech. A 10-minute article generates a 10MB file. Plan storage accordingly, especially for high-volume sites.
API Costs: OpenAI TTS costs approximately $15 per million characters. A 2,000-word article is roughly 12,000 characters, costing about $0.18. For most sites, this is negligible. For very high-volume publishing, you might explore self-hosted alternatives like Mozilla TTS or Coqui.
Caching: The generated audio files are permanent media entities. They're only regenerated if you delete them or re-save the content. This keeps ongoing costs minimal.
A Couple of Extra Ideas
This implementation is just a teaser into audio related content. Here are some directions to explore:
Multiple Voices: Configure different voices for different content types or authors, creating distinct audio personalities for different sections of your site. With providers like ElevenLabs you can even personalise your voice.
Multilingual Audio: Combine this with Drupal's multilingual capabilities to generate audio in multiple languages automatically.
Podcast RSS Feed: Use Drupal's Views module to create an RSS feed of your audio files, making your site subscribable in podcast apps.
Audio Summaries: Instead of converting the entire article, create a separate "Summary" field and generate audio from that, giving listeners a condensed version.
Resources
- Drupal AI Module - The foundation for AI capabilities in Drupal
- Sticky Audio Player Module - My contribution for Spotify-like audio experiences
- OpenAI Text-to-Speech Documentation - Voice samples and API details
- Drupal AI YouTube Series - Comprehensive tutorials on AI in Drupal
For more AI implementations in Drupal, check out our guide on 5 AI Quick Wins for Drupal, or explore AI-assisted development workflows.
Conclusion
To wrap this up, the shift to audio-first content isn't coming - it's already here. With consumer behaviour shifting to more on-the-go/multitask-oriented consumption, organisations that adapt now will meet audiences where they already are, rather than just being glanced over and forgotten about.
In terms of actually building audio-first experiences in Drupal, it is straightforward with the right tools. Our team specialises in Drupal development and AI integration, helping organisations across New Zealand implement intelligent content experiences that drive real engagement. Explore our case studies to see the results, or learn more about our approach to modern Drupal development.