Complete Guide: Setting Up Drupal on Digital Ocean
Simplifying the Deploy Process: Drupal on Digital Ocean.
Estimate time: 2-3 hours
Getting Drupal up and running on my own resource has always been intimidating. Traditionally, I would struggle with CI/CD pipelines, dependencies and server config. I would spend hours sifting through conf files or trying to scp the code just right. Now we have the tooling to spin up sites to play with far easier - think Drupal Forge and Drupal CMS Launcher - but I always prefer to understand how we get to the magic and that is where (a rather simple) Digital Ocean droplet comes in.
This guide walks you through a simple (and cheap) installation using a Digital Ocean droplet. You will need a little bit of technical background so a nice chatgpt here or there might help. If you're interested in understanding the broader Drupal ecosystem in New Zealand, check out our analysis of the State of Drupal in NZ.
Prerequisites
- Digital Ocean account
- Database of choice
- Domain name (optional, but recommended)
- Basic command line knowledge
- SSH key pair for secure access
Part 1: Digital Ocean Droplet
First, we'll rip right into it in Digital Ocean. Just go ahead and create a droplet. The droplet creation process has several steps that we'll walk through:
Step 1: Choose Your Region
Start by selecting the region closest to your users for optimal performance. Digital Ocean has data centers worldwide.
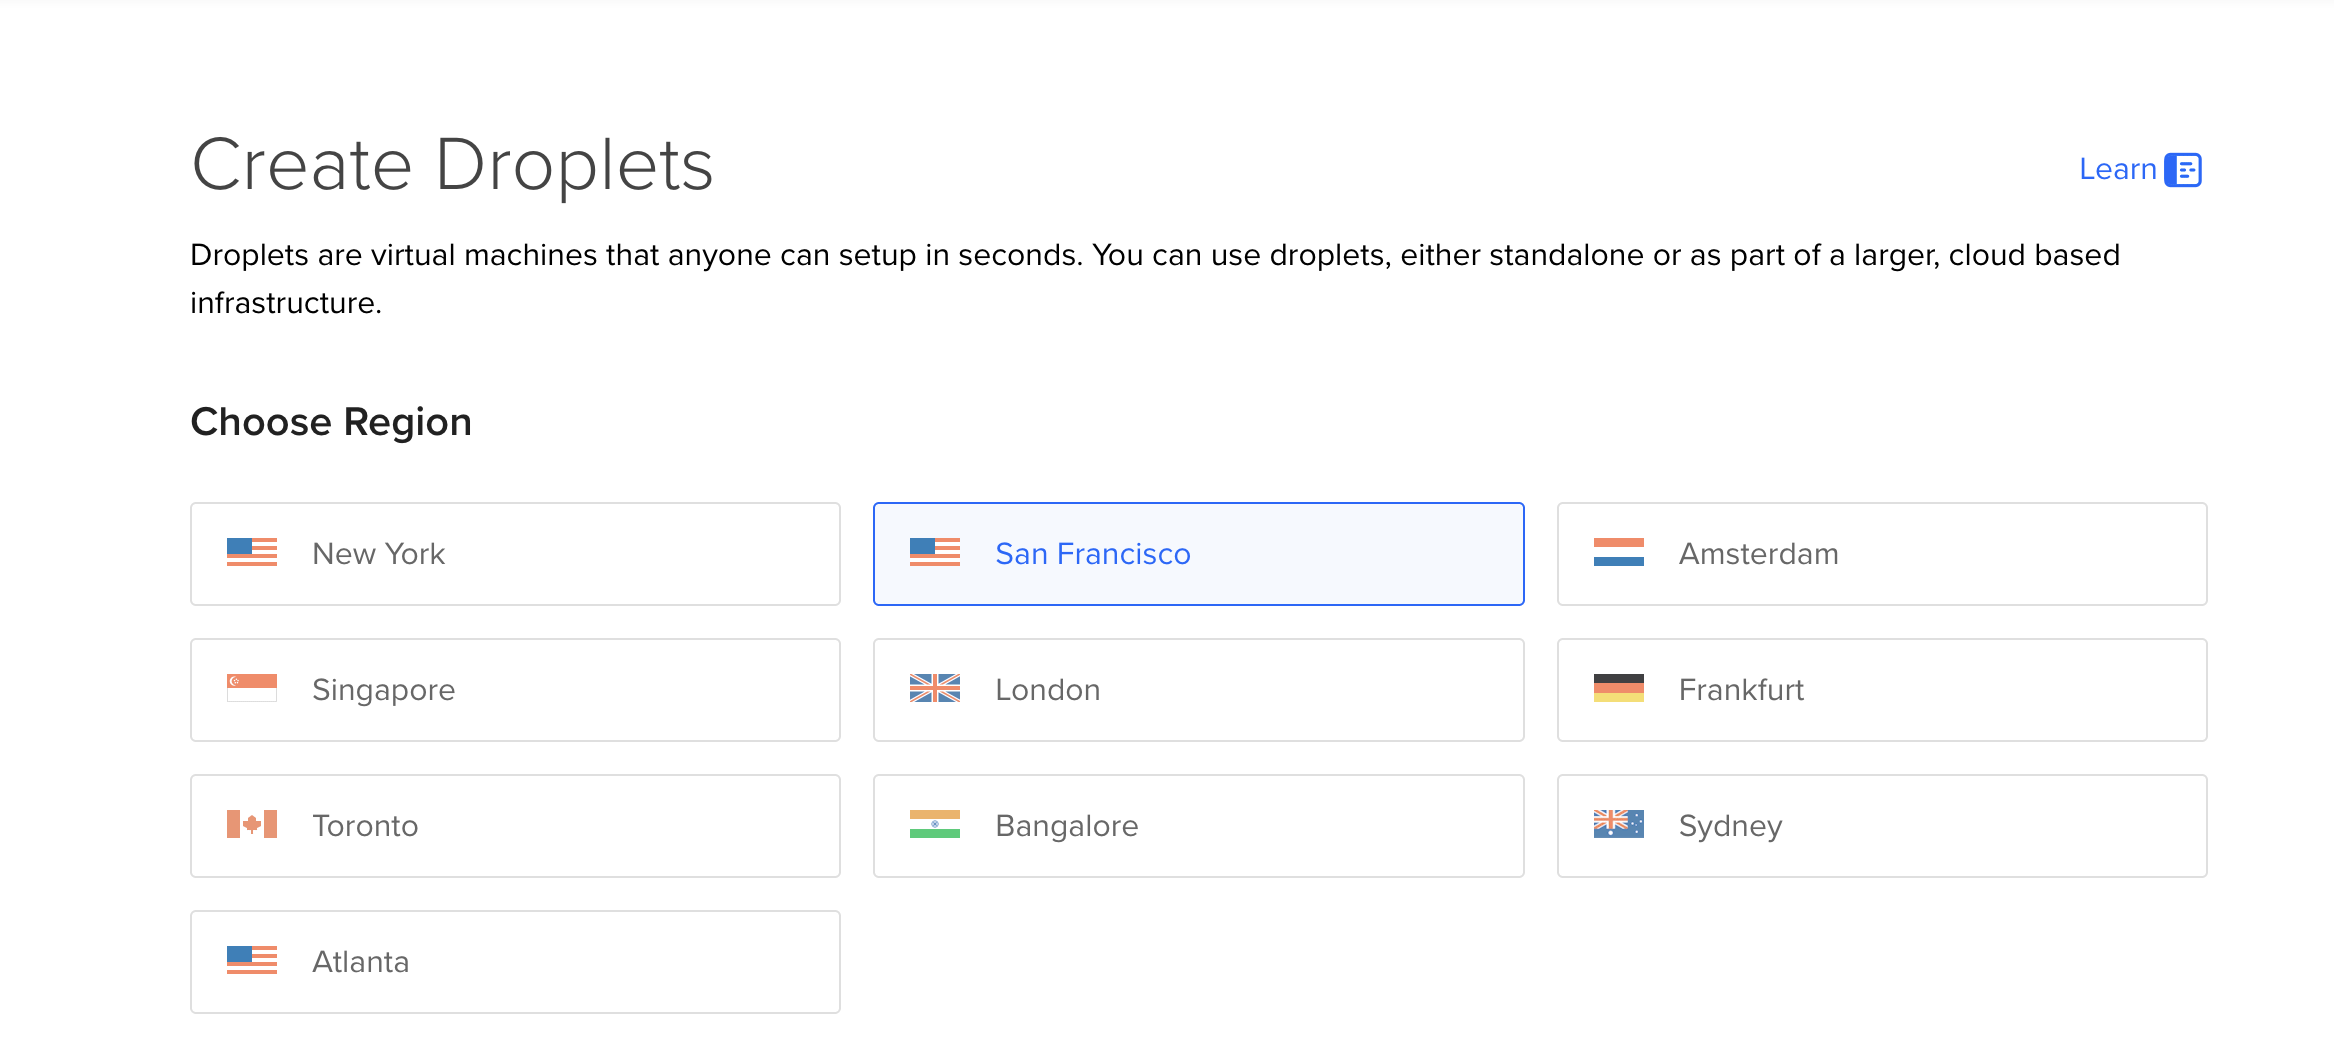 Select the datacenter region nearest to your users. I typically choose Sydney for Australian users, but pick whatever works best for your audience.
Step 2: Choose Your Operating System
For this guide, we'll use Ubuntu as it's well-supported and has excellent documentation for Drupal deployments.
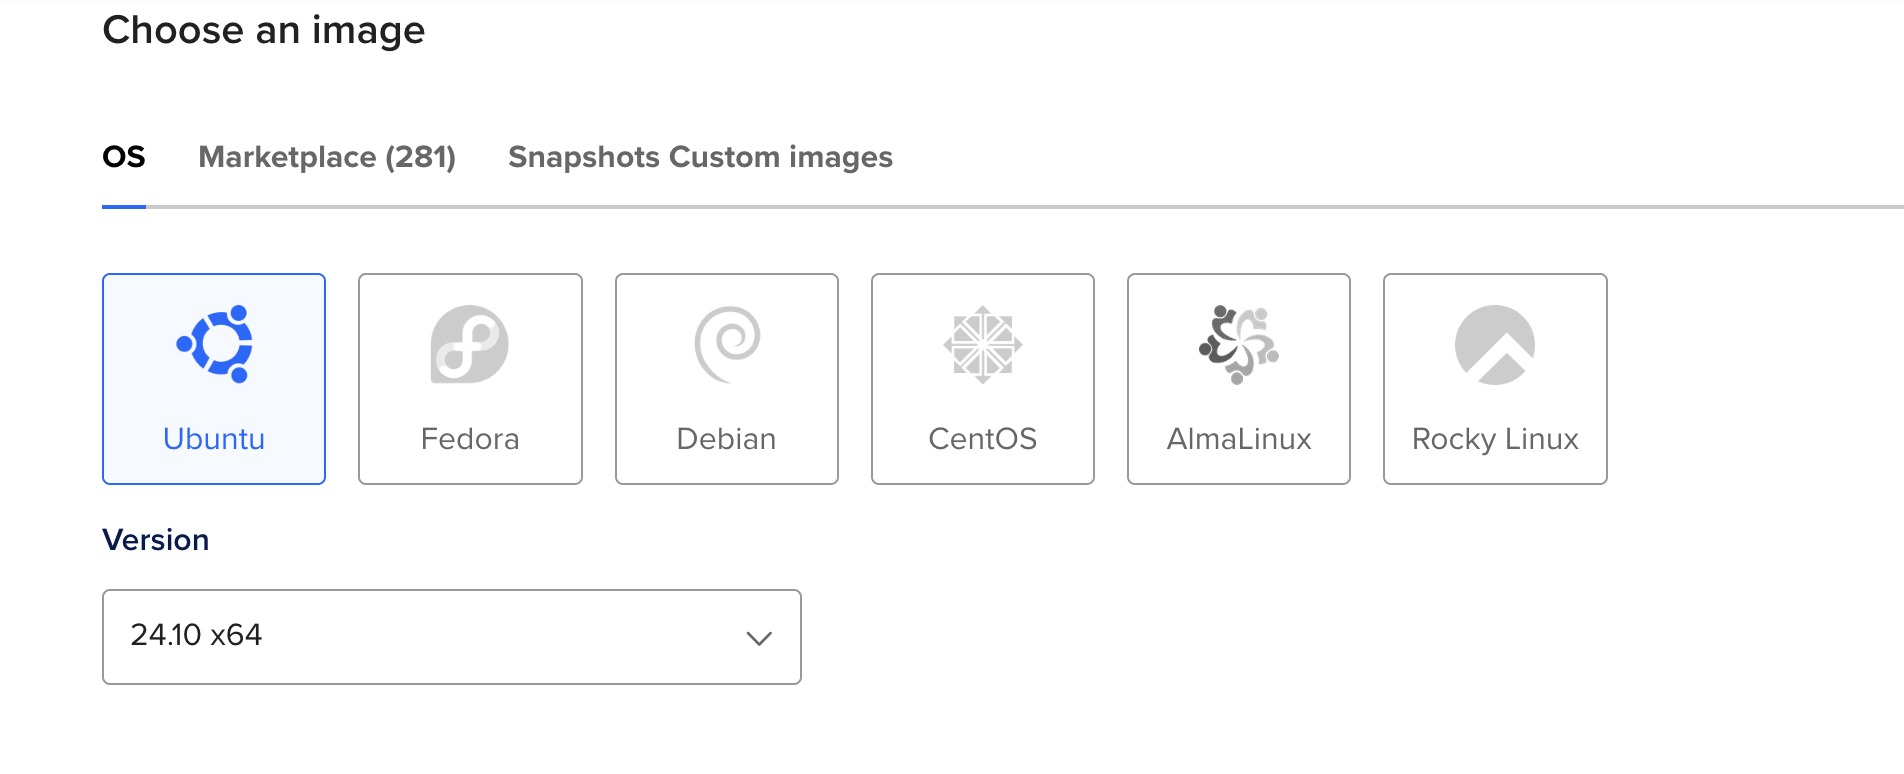 Choose Ubuntu from the OS options. Ubuntu 24.10 x64 is a solid choice for Drupal hosting.
Step 3: Select Your Droplet Size
Here's where you balance cost and performance. For development or small sites, the $4/month option works great. For production sites with traffic, consider the $6 or $12 options.
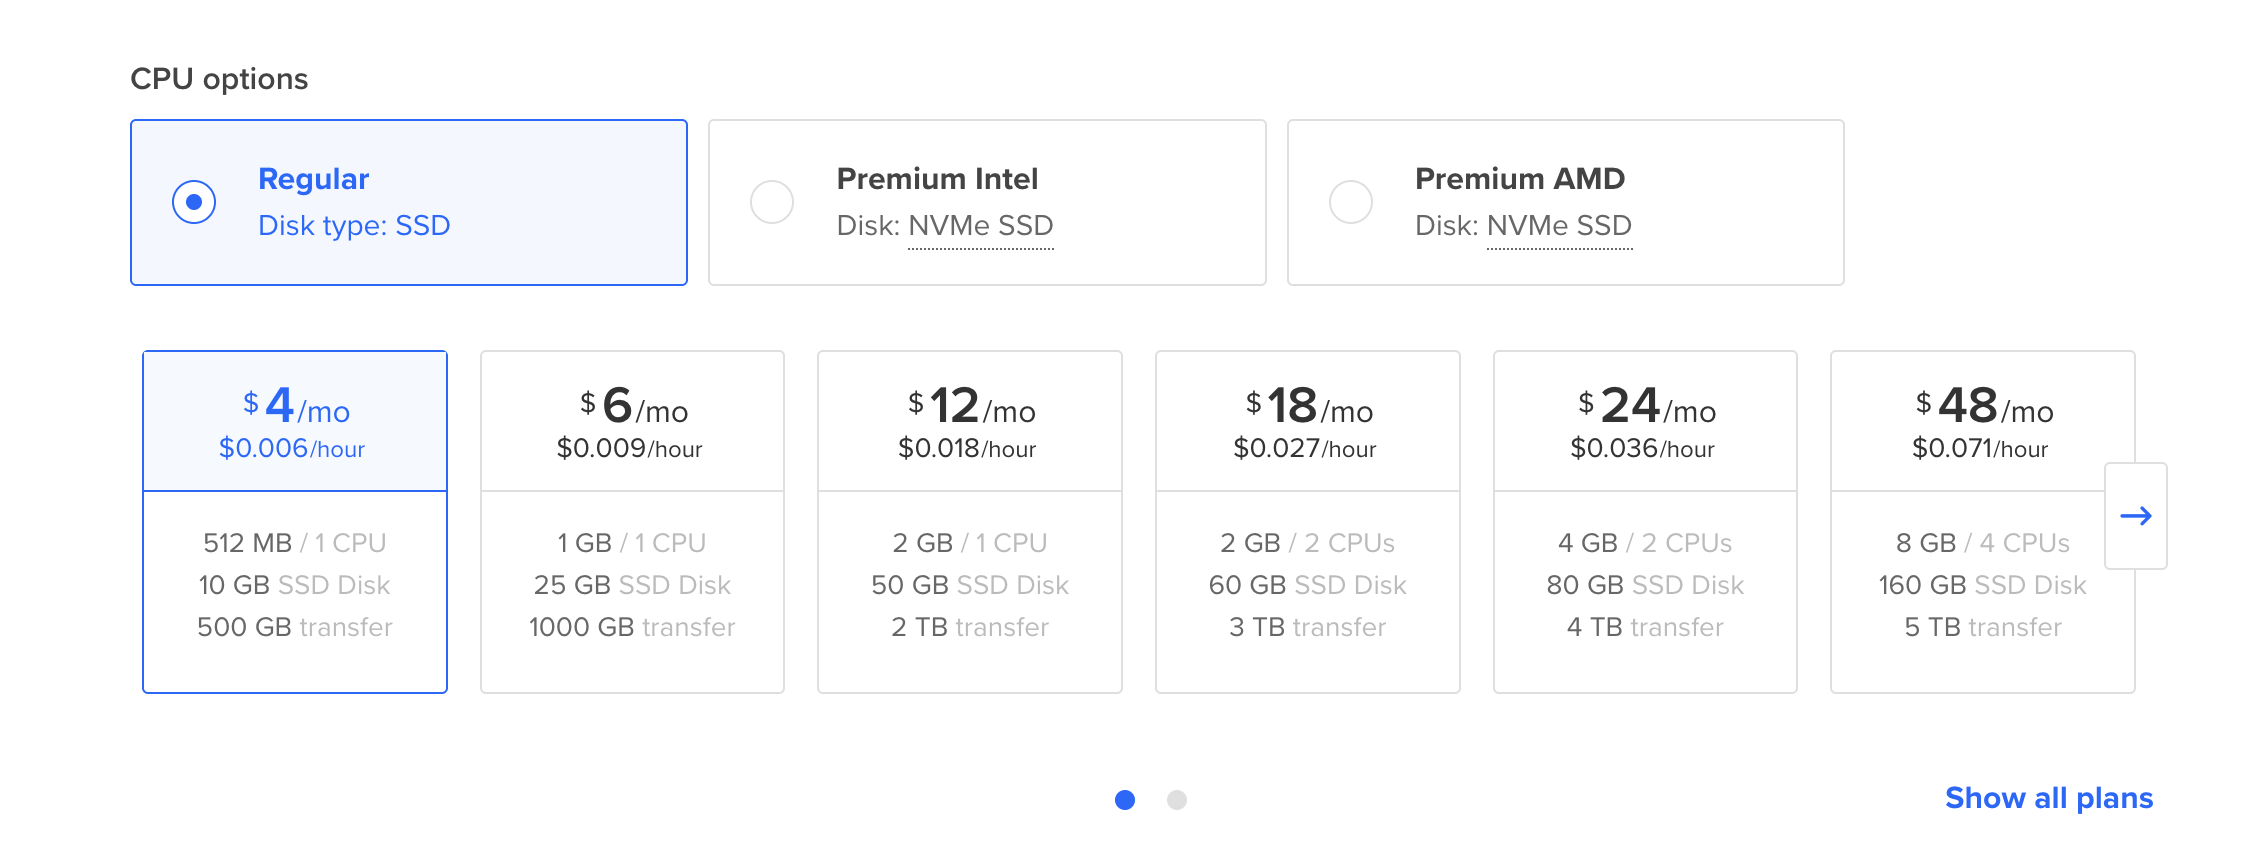 The $4/month basic droplet is perfect for testing and small sites. The 512MB RAM and 10GB SSD provide adequate resources for a simple Drupal installation.
Step 4: Configure Authentication
Always use SSH keys for secure access to your droplet. This is much more secure than password authentication. For a guide on SSH key creation, Digital Ocean has a nice guide here.
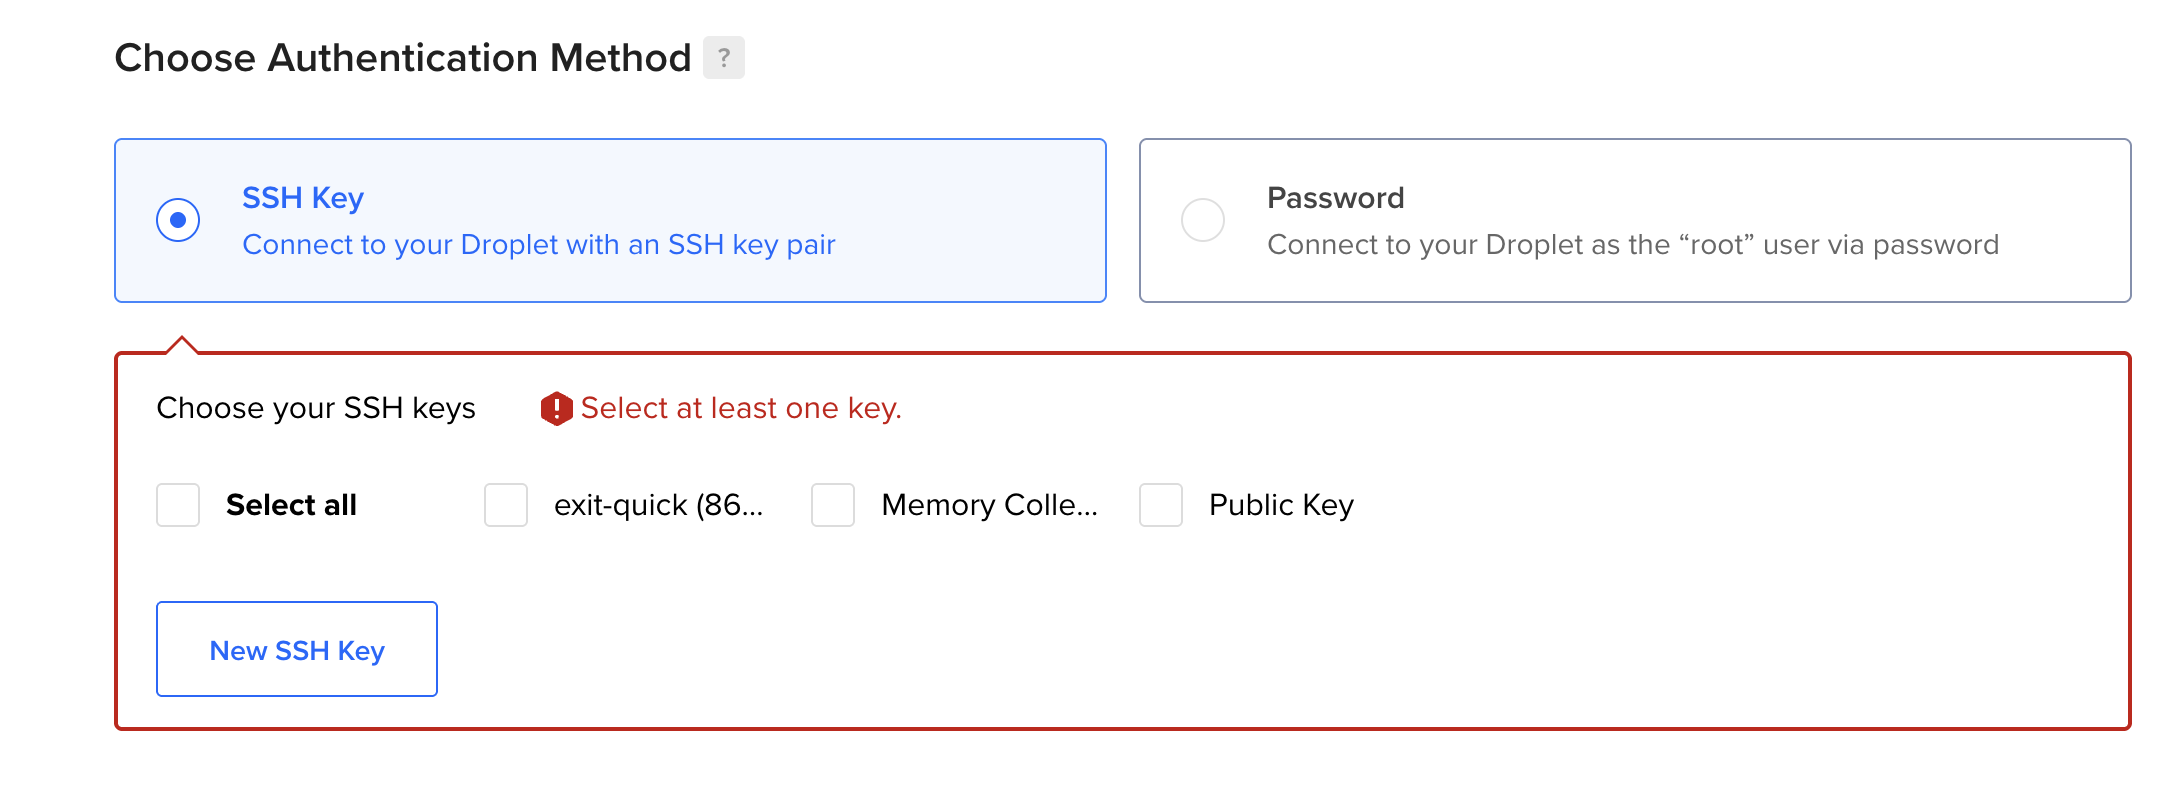 Choose SSH Key authentication and select an existing key or create a new one. Never use password authentication for production servers.
Once you've configured these options, click "Create Droplet" and wait for Digital Ocean to provision your new server. This usually takes 1-2 minutes.
Part 2: Server Setup and User Configuration
Now that your droplet is up and running, it's time to open up that command line and feel like a hacker man. Grab your public IP (on the droplet homepage) and ssh in!
An example of this is:
ssh ~/.ssh/id_rsa [email protected]
Creating a Non-Root User
Let's create a new user first as security best practice tells us to create a dedicated user account instead of using root:
# Create new user and add to sudo group
adduser george &&
usermod -aG sudo george &&

# Configure firewall
ufw app list &&
ufw allow OpenSSH &&
ufw enable &&
ufw status &&

# Copy SSH keys to new user
rsync --archive --chown=george:george ~/.ssh /home/george
This creates a user 'george', grants sudo privileges, configures the firewall to allow SSH, and copies your SSH keys for secure access. Exit out of your server and SSH back in with your new user.
Part 3: Web Server Installation
Installing Nginx and PHP 8.3
We'll be leveraging nginx as our web server. Nginx provides excellent performance for Drupal sites (if you want some more info have a read of this comprehensive nginx guide). We'll install it alongside PHP 8.3:
# Update package manager and install Nginx
sudo apt update &&
sudo apt install nginx &&
sudo systemctl start nginx &&
sudo systemctl enable nginx &&
sudo ufw allow 'Nginx Full'
PHP 8.3 Installation
Install PHP 8.3 with essential Drupal modules:
# Install PHP 8.3 and required extensions
sudo apt install php8.3 &&
sudo apt install php8.3-{curl,dom,gd,mbstring,xml,zip,mysql,fpm}
These extensions are essential for Drupal:
- curl: HTTP requests and API integrations
- dom: XML/HTML manipulation
- gd: Image processing
- mbstring: Multi-byte string handling
- xml: XML parsing
- zip: Archive handling
- mysql: Database connectivity
- fpm: FastCGI Process Manager
Removing Apache2 (if present)
Digital Ocean droplets sometimes come with Apache2 pre-installed. Remove it to avoid conflicts:
sudo systemctl stop apache2 &&
sudo apt purge apache2 apache2-utils &&
sudo apt autoremove &&
sudo apt autoclean
Part 4: Composer Installation
Composer is a PHP package manager and will act as the backbone of your Drupal site. Any module/library that you need will generally be installed through Composer. Let's install in:
# Install prerequisites
sudo apt update &&
sudo apt install php-cli unzip &&
cd ~ &&

# Download and verify Composer
curl -sS https://getcomposer.org/installer -o /tmp/composer-setup.php &&
HASH=$(curl -sS https://composer.github.io/installer.sig) &&
php -r "if (hash_file('SHA384', '/tmp/composer-setup.php') === '$HASH') { echo 'Installer verified'; } else { echo 'Installer corrupt'; unlink('composer-setup.php'); } echo PHP_EOL;" &&

# Install Composer globally
sudo php /tmp/composer-setup.php --install-dir=/usr/local/bin --filename=composer
Part 5: Drupal Installation
Creating Drupal Project
Now let's get Drupal running. Navigate to your web directory and create a new Drupal project:
# Navigate to web root
cd /var/www/

# Create Drupal project using Composer
sudo composer create-project drupal/recommended-project drupal

# Set proper permissions
sudo chown -R george:www-data drupal
sudo chmod -R 755 drupal
Setting Up Drush
Drush is the Drupal command-line tool. Add an alias for easy access:
# Add Drush alias to bash profile
echo "alias drush='/var/www/civicforms/vendor/bin/drush'" >> ~/.bashrc

# Reload bash profile
source ~/.bashrc
Part 6: Nginx Configuration
We need to link our site root up to our server so it knows where and what to serve. We do this through nginx config files.
Creating Nginx Virtual Host
Create a new Nginx configuration file for your Drupal site:
sudo nano /etc/nginx/sites-available/drupal
Add the following configuration:
server {
    listen 80;
    server_name your-domain.com www.your-domain.com;
    root /var/www/drupal/web;
    index index.php index.html index.htm;

    location / {
        try_files $uri $uri/ /index.php?$query_string;
    }

    location ~ \.php$ {
        include snippets/fastcgi-php.conf;
        fastcgi_pass unix:/var/run/php/php8.3-fpm.sock;
        fastcgi_param SCRIPT_FILENAME $document_root$fastcgi_script_name;
        include fastcgi_params;
    }

    location ~ /\.ht {
        deny all;
    }

    # Drupal specific configurations
    location = /favicon.ico {
        log_not_found off;
        access_log off;
    }

    location = /robots.txt {
        allow all;
        log_not_found off;
        access_log off;
    }

    location ~* \.(txt|log)$ {
        deny all;
    }

    location ~ \..*/.*\.php$ {
        deny all;
    }

    location ~ ^/sites/.*/private/ {
        deny all;
    }

    location ~ ^/sites/[^/]+/files/.*\.php$ {
        deny all;
    }

    location ~* ^/.well-known/ {
        allow all;
    }

    location ~ (^|/)\. {
        deny all;
    }
}
Enable the Site
# Enable the site
sudo ln -s /etc/nginx/sites-available/drupal /etc/nginx/sites-enabled/

# Test Nginx configuration
sudo nginx -t

# Restart services
sudo systemctl restart php8.3-fpm
sudo systemctl restart nginx
PHP-FPM Configuration
Ensure PHP-FPM is configured correctly:
# Edit PHP-FPM pool configuration
sudo nano /etc/php/8.3/fpm/pool.d/www.conf
Verify the listen directive matches your Nginx configuration:
listen = /var/run/php/php8.3-fpm.sock
Part 7: Database Configuration and Drupal Settings
Database Options
Before we configure Drupal, you have several database options depending on your needs and budget:
Option 1: Digital Ocean Managed MySQL Database (Recommended for production)
- Automated backups and updates
- High availability and scaling
- SSL encryption by default
- Starting from $15/month
Option 2: Self-hosted MySQL on your droplet (Budget-friendly)
- Install MySQL directly on your droplet
- More manual maintenance required
- Good for development or small sites
- Only costs your droplet fee
Option 3: SQLite (Simplest for testing)
- File-based database
- No separate database server needed
- Perfect for development or very small sites
- Built into PHP
Option 4: Any cheap MySQL provider
- Services like PlanetScale, Aiven, or even shared hosting databases
- Often have free tiers available
- Good middle ground between managed and self-hosted
Creating Drupal's Settings File
Now we need to configure Drupal's database connection. Create a local settings file:
# Navigate to Drupal's settings directory
cd /var/www/drupal/web/sites/default

# Copy the default settings file
sudo cp default.settings.php settings.php

# Create local settings file for our configuration
sudo nano settings.local.php
Add the following configuration to settings.local.php:
<?php

/**
 * Database configuration
 * Update these values based on your chosen database option
 */

$host = "db";  // Your database host
$port = 3306;  // MySQL default port (25060 for DO managed DB)
$driver = "mysql";  // or "sqlite" if using SQLite

$databases['default']['default']['database'] = "db";
$databases['default']['default']['username'] = "db";
$databases['default']['default']['password'] = "db";
$databases['default']['default']['host'] = $host;
$databases['default']['default']['port'] = $port;
$databases['default']['default']['driver'] = $driver;

// Important: Generate your own unique hash salt (see below for how)
$settings['hash_salt'] = 'YOUR_UNIQUE_HASH_SALT_HERE';

// Recommended setting for Drupal 10 only
$settings['state_cache'] = TRUE;

// This will prevent Drupal from setting read-only permissions on sites/default
$settings['skip_permissions_hardening'] = TRUE;

// This will ensure the site can only be accessed through intended host names
// Additional host patterns can be added for custom configurations
$settings['trusted_host_patterns'] = ['.*'];
Generate Your Unique Hash Salt
IMPORTANT: Never use the example hash salt in production! Here's how to generate your own:
Option 1: Command Line (Recommended)
If you're on your server, generate a secure hash salt:
# Generate a random 64-character hex string
openssl rand -hex 32
This will output something like:
a8f5f167f44f4964e6c998dee827110c52c74d7b38e41b2c2b0c1b7b2c0d1e2f
Option 2: Online Generator
If you prefer a web-based approach, use a trusted online generator:
- General Random String: Random.org String Generator
Option 3: PHP Command
You can also generate one using PHP directly:
php -r "echo bin2hex(random_bytes(32)) . PHP_EOL;"
Copy your generated hash salt and replace YOUR_UNIQUE_HASH_SALT_HERE in the settings file above.
Include Local Settings
Now we need to tell Drupal to include our local settings. Edit the main settings file:
sudo nano settings.php
Add these lines at the bottom of the file:
// Include local settings
if (file_exists($app_root . '/' . $site_path . '/settings.local.php')) {
  include $app_root . '/' . $site_path . '/settings.local.php';
}
Set Proper Permissions
# Set correct permissions on settings files
sudo chmod 644 settings.php
sudo chmod 644 settings.local.php
sudo chown george:www-data settings.php settings.local.php
Test Your Site
At this point, you should be able to see your Drupal site active at your droplet's IP address! Navigate to your server's IP in a browser and you should see the Drupal installation screen.
http://YOUR_DROPLET_IP
If you see the Drupal installation page, congratulations! Your server is properly configured. If you encounter any errors, check the nginx error logs:
sudo tail -f /var/log/nginx/error.log
Important Notes:
- Replace the database credentials with your actual database information
- Generate a unique
hash_saltfor production sites (you can useopenssl rand -hex 32or online generators) - The
trusted_host_patternssetting allows any domain for development - restrict this for production - For Digital Ocean managed databases, remember to use SSL and the correct port (usually 25060)
Woohoo! Now you should have a functioning Drupal site. But we all know it's not a site until we have a domain name preoperly attached. So let's do that.
Part 8: Domain and DNS Configuration
Digital Ocean DNS Setup
-
Add Domain to Digital Ocean:
- Go to Digital Ocean Control Panel > Networking > Domains
- Add your domain name
- Create DNS records:
- A record:
@pointing to your droplet's IP - CNAME record:
wwwpointing to@
- A record:
-
Update Domain Nameservers: Replace your domain's nameservers with:
- ns1.digitalocean.com
- ns2.digitalocean.com
- ns3.digitalocean.com
Wait for your DNS to propagate and voila, you should be in busienss!
Alternative: Cloudflare Setup
For better performance and security, you can use Cloudflare:
- Add your domain to Cloudflare
- Update nameservers to Cloudflare's
- Configure DNS records in Cloudflare dashboard
Part 8: SSL Certificate with Let's Encrypt
Installing Certbot
# Install Certbot for Nginx
sudo apt install certbot python3-certbot-nginx
Obtaining SSL Certificate
# Get SSL certificate (replace with your domain)
sudo certbot --nginx -d your-domain.com -d www.your-domain.com
Certbot will:
- Obtain certificates from Let's Encrypt
- Automatically configure Nginx
- Set up auto-renewal
Verify Auto-Renewal
# Test certificate renewal
sudo certbot renew --dry-run
Part 9: Security Hardening
File Permissions
Set proper file permissions for security:
cd /var/www/drupal

# Set directory permissions
find . -type d -exec chmod 755 {} \;

# Set file permissions
find . -type f -exec chmod 644 {} \;

# Make files directory writable
chmod -R 755 web/sites/default/files
Additional Security Measures
-
Update regularly:
composer update drush updatedb drush cache:rebuild -
Monitor logs:
sudo tail -f /var/log/nginx/error.log sudo tail -f /var/log/nginx/access.log -
Configure automated backups through Digital Ocean's backup service
Troubleshooting Common Issues
PHP-FPM Socket Issues
If you encounter 502 errors, verify PHP-FPM is running:
sudo systemctl status php8.3-fpm
sudo systemctl restart php8.3-fpm
Database Connection Issues
- Verify SSL mode is set to REQUIRED
- Check firewall rules allow database port
- Confirm credentials are correct
Permission Issues
# Reset permissions if needed
sudo chown -R george:www-data /var/www/drupal
sudo chmod -R 755 /var/www/drupal
Performance Optimization
Nginx Optimization
Add to your Nginx configuration:
# Enable gzip compression
gzip on;
gzip_vary on;
gzip_types text/plain text/css application/json application/javascript text/xml application/xml;

# Browser caching
location ~* \.(jpg|jpeg|png|gif|ico|css|js)$ {
    expires 1y;
    add_header Cache-Control "public, immutable";
}
PHP Optimization
Edit PHP configuration:
sudo nano /etc/php/8.3/fpm/php.ini
Recommended settings:
memory_limit = 512M
upload_max_filesize = 64M
post_max_size = 64M
max_execution_time = 300
Conclusion
See that wasn't too painful now! You now have a fully configured, Drupal site running on Digital Ocean ready for you to unleash your creative energy on.
Remember to keep your system updated and monitor your site regularly. For ongoing maintenance, consider setting up automated backups, monitoring, and update schedules to keep your Drupal site secure and performant.
Once your Drupal infrastructure is solid, you might want to explore AI capabilities for Drupal to enhance your content workflows, or check out our guide on essential SEO modules to ensure your site ranks well from day one.
Need Help with Drupal Hosting and Infrastructure?
While this guide covers the fundamentals, setting up production-grade Drupal infrastructure with proper security, monitoring, and performance optimization requires expertise. Our team specializes in Drupal development and infrastructure services, helping organizations across New Zealand deploy robust, scalable Drupal sites.
We've helped clients migrate from shared hosting nightmares to optimized Digital Ocean setups with automated deployments, security hardening, and 24/7 monitoring. Check out our case studies to see the results, or explore our approach to Drupal best practices.